
This version of the essay is for Blonde Guy computers with eComStation.
Use the following link to How to use an ArcaOS-based Blonde Guy recovery DVD
This page describes how to use a Blonde Guy recovery DVD. The purpose of the recovery DVD is to restore the original eComStation installation as supplied by Blonde Guy.
If you have the original hard drive, and the Maintenance volume is still working, you can more easily restore the eComStation volume by booting the Maintenance volume.
The recovery DVD is bootable. If you have no bootable volumes, for example if you have a new hard disk, then the recovery DVD is the easiest way to restore eComStation.
The factory configuration has the four volumes listed in the table below. Newer Blonde Guy computers use different drive letters and Air-Boot instead of Boot Manager, but the usage of the recovery DVD is similar.
| Volume Name | Disk Format | Drive Letter | Volume Size |
|---|---|---|---|
| Boot Manager | - | - | 7 MB |
| eComStation | JFS | C: | 4,000 MB |
| Data | JFS | D: | whatever is left |
| Maintenance | JFS | E: | 4,000 MB |
| Programs | JFS | F: | 8,000 MB |
To install the system using the Recovery DVD, the computer is booted to the DVD, and the user will create the disk volumes and install boot manager. All of the volumes must be formatted JFS. The recovery DVD has a zip archive for each volume. After each archive is unzipped to the corresponding volume, the computer is restored.
This section describes partitioning the hard drive using mini-LVM. Older Blonde Guy recovery disks only provide LVM. If you have such a recovery DVD, or if you prefer LVM to mini-LVM, skip ahead to the next section, Partitioning the hard drive using LVM.
This guide will assume that you are starting with a blank hard drive. If your hard drive already contains data, like a Windows operating system, for example, you may not be able to operate the hard drive.
Boot the Recovery DVD and run mini-LVM. You should be able to see your hard drive. If not, do not proceed, something is wrong with either the hard drive or with the hard drive support on the Recovery DVD.
Name the hard drive. Use the System:Rename disk... menu to name your hard drive. Choose a name that will uniquely identify this hard drive. Save the changes. You should not see an error at this point. If you do, something is wrong with the computer, or the hard drive, or the hard drive support on the Recovery DVD.
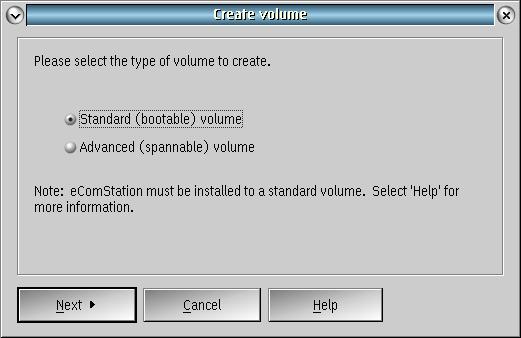
Create each new volume in the table above. To create a volume, use the Volume:Create new... menu. The first page of the Create Volume dialog will appear. For the eComStation and Maintenance volumes, select a bootable volume type. For Programs and Data, select an advanced volume type.
On the second page of the Create Volume dialog, select the name and enter the volume name from the table above.

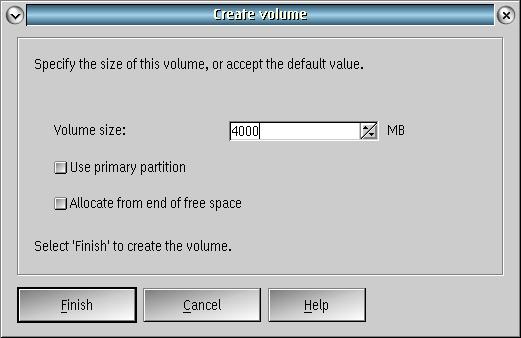
On the third page of the Create Volume dialog, enter the size of the volume to be created from the table above. Each volume you create will be a logical volume. It does not matter if you create volumes at the beginning or the end of free space.
After creating all the volumes, save the changes you have made. No error message should appear.
The boot manager will be installed to the master boot record of the hard drive. To install the boot manager, use the System:Install Boot Menu:Install/Update menu. No error message should result from this. Exit the mini-LVM program.
The Boot Manager can be configured at boot time. No configuration is needed to boot the volumes created by this procedure.
The installation is fairly simple, but the user should be comfortable with creating volumes with the LVM program. If
The first step is to create the volumes as shown in the table. The Logical Volume Management Tool (LVM) program will be used to create to disk layout. To run the LVM program, boot the recovery DVD and open an OS/2 command window. Type LVM and press enter. You should see the LVM program start and display the disk layout.
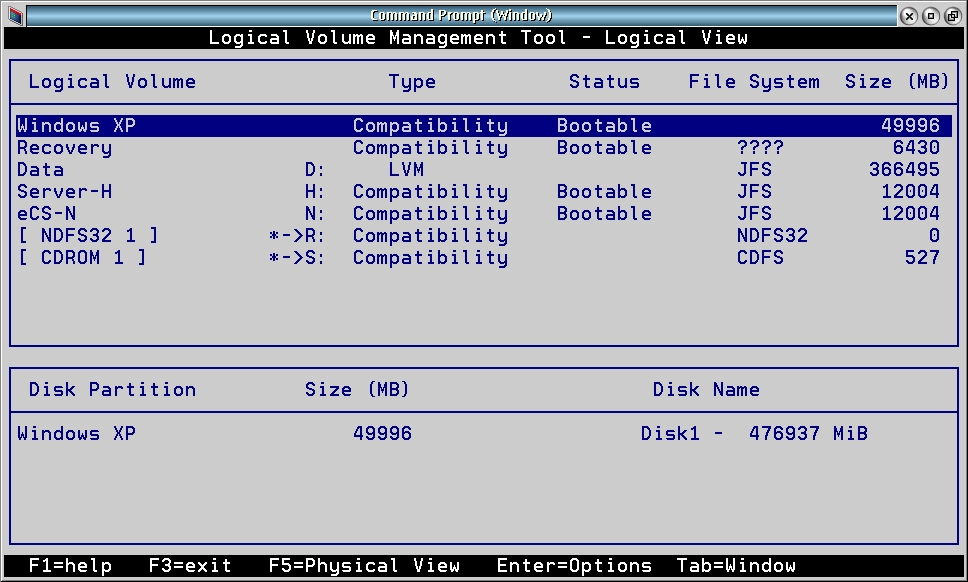
This screen shows the LVM logical view. If the disk is new, then the LVM display will be blank. LVM is a character-base program, and the menu is accessed by pressing the enter key.
The first step with a blank hard disk is to install Boot Manager. Press enter to bring up the context menu, and select install boot manager.
Once boot manager is installed, you will create all the volumes. Press enter to bring up the contect menu, and select Create a new volume. LVM offer the choice to Create a volume that does not need to be bootable or to create a volume that can be made bootable. For the eComStation and Maintenance volumes, you will create a volume that can be made bootable. For the Programs and Data drives, you will create a volume that does not need to be bootable. LVM will then offer a list of drive letters for the new volume. Choose the letter from the table above. LVM will offer to name the new volume. Choose the name from the table above and press Enter.
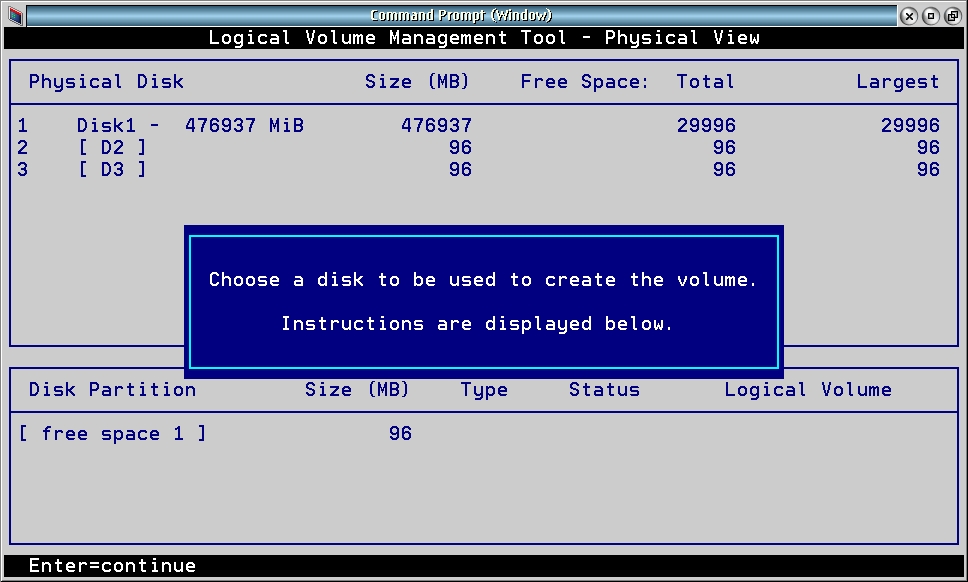
LVM will change to the Physical view so you may choose where the new volume is to be created. Press enter to start choosing the location of the volume. First select the disk. LVM will offer to use an existing partition or Allocate from free space. For new disk with no partitions LVM may skip this choice. Otherwise, select Allocate from free space and press Enter. LVM will present a list of the free space on the disk. On a new disk, only free space 1 will be available. LVM will allow you to name the partition. Choose the name from the disk layout table above. LVM will allow you to enter a size for the partition. Enter the size from the table above and press Enter. The volume will be created.
You will repeat the steps above to create all the volumes in the table. The changes are not written to disk until you commit them. To commit the changes, press the F3 key. LVM will allow you to Return to the Program, Discard the changes and exit, or Save the changes and exit. Choose Save the changes and exit, and wait for LVM to apply all of the changes.
Each of the volumes that have been created needs to be formatted with the JFS file system. To begin, open an OS/2 Window. The command line to format a volume is shown below.
format c: /fs:jfs /v:eComStation
The system may give various prompts, but the volume should be formatted. If the system gives no response at all, then something has gone wrong and the Recovery DVD should be rebooted and this step should be tried again.
If the format was successful, then repeat this step with the other drive letters and volume names. All of the volumes should be formatted in this step. The commands are listed below.
format d: /fs:jfs /v:Data
format e: /fs:jfs /v:Maintenance
format f: /fs:jfs /v:Programs
The saved eCS installations are zip archives in the S:\images directory. The restore will also be done from the OS/2 Window. Change to the S:\images directory. The command to unzip the archives is shown below.
unzip eComStation.zip -d c:
The result of this command should be to list every file being restored. No errors should result, but some can be ignored. If there is a file to be overwritten, allow zip to do so.
Repeat this unzip instruction for the Maintenance and Programs volumes. When those commands are completed, the restoration is complete.
Reboot the computer to see the new Boot Manager screen. Select eComStation to boot the newly restored volume.