
I've got an Epson Workforce WP-4090 in the office. This printer is an excellent choice for eCS users who need a networked, duplexing, postscript color printer. It's an inkjet with very good cost per page. A PPD file is available to configure OS/2 and eCS printing support.
I have had an Epson Sylus C-88+ color inkjet for many years. It's still available for sale, it has terrific cartridge life, and is good for someone who needs to print occasionly. Native OS/2 printer support is available with the epomni5 driver.
OS/2 and eComStation offer a number of ways to print to a remote printer which is connected on a TCP/IP network. OS/2 can act as a print server on the TCP/IP network. The screen shots used on this page have been generated on eComStation 2.0 rc 6a.
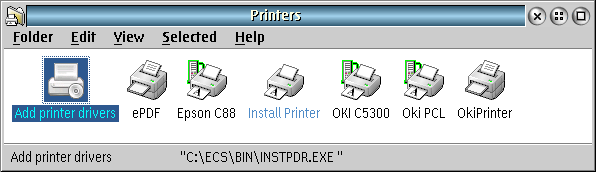
Each printer attached to your computer is represented by one or more printer objects. The printer object has a properties notebook, which can configure almost every aspect of printing. Printer objects can exist anywhere on the desktop, but are normally stored in the Printers folder.
There are two types of printer objects on the system, a Printer object and a Network Printer object. The icons for the two types are shown above in the Printers folder. Printers that print over the TCP/IP network are Printer objects, which can be confusing. The Network printer refers to printers shared by the File and Print client.
On OS/2, to create a new printer to use for TCP/IP printing, drag a Printer object from the templates folder to the printers folder. On eComStation, use the install printer program to create a new printer.
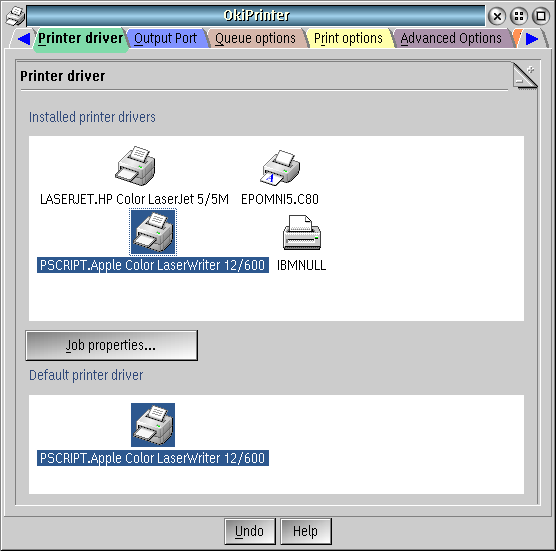
Each Printer object is associated with one Printer driver. The Printer driver is selected on the Printer Driver tab of the Printer properties notebook. To view or change the printer driver for a printer object, right click on the printer object to bring up the context menu and select "Properties."
The printer driver that is associated with the printer object is displayed in the lower window. This is the default printer driver. You can select any one of the installed printer drivers from the upper window by clicking on the icon for that printer driver. That printer will then become the default printer driver for the printer object
To install a new printer driver, right click on any printer driver icon and select "Install..."
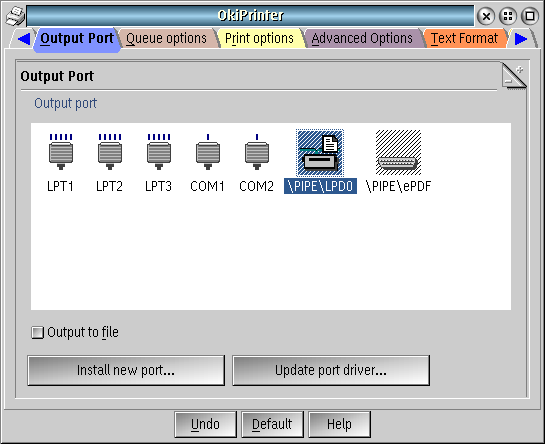
The output port is selected in the Output port tab of the printer properties notebook. The output port has properties, too. Right-click on the output port icon and select "properties..." to bring up the output port properties notebook.
The Output Port page of the printer properties lists all of the output ports available for printing. The Line printer ports or Parallel Ports are LPT1, LPT2 and so on. The Serial ports are COM1 and COM2. The ports for TCP/IP printing are \PIPE\LPD0 and so on.
Other ports, such as \PIPE\ePDF which allows printing to a PDF may be installed as well. USB attached printers print to a port that is generated when you plug the USB printer into the computer.
To configure printing to a printer that is attached to the TCP/IP network, open the port settings dialog. Right click the \PIPE\LPD0 icon and select "properties..." to bring up the settings dialog.
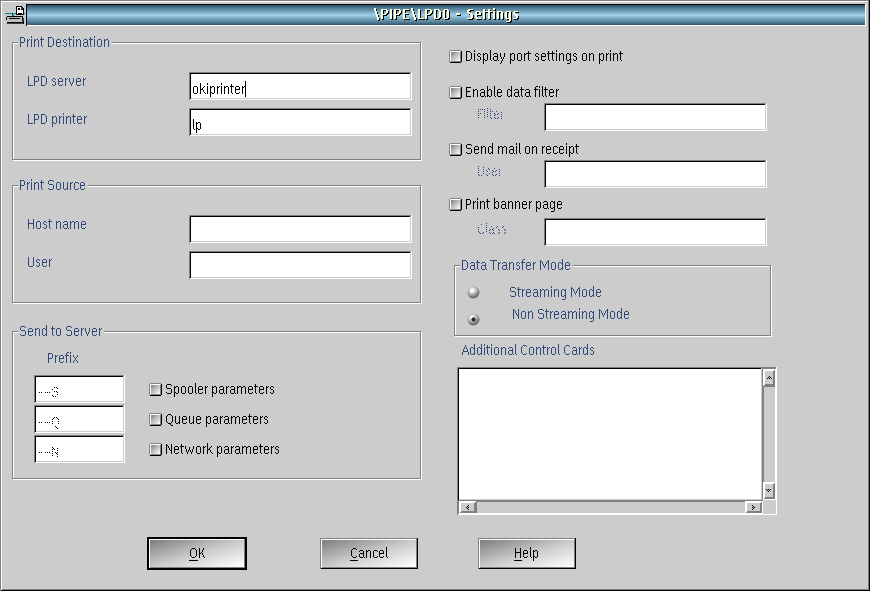
The Output port settings dialog is where the LPD server and LPD printer are specified. The LPD server is identified either by the IP address or the hostname of the print server. In the screen shot above, the LPD server name is the hostname of the network attached printer. The printer's hostname is set in the hosts file.
The LPD printer is the name of the printer. The printer name in this case is set by the printer manufacturer.
If the printer is attached to another computer running LPD, then the LPD server is the hostname or IP Address of the server, and the printer name is the physical name of the printer object defined for the printer on the server.
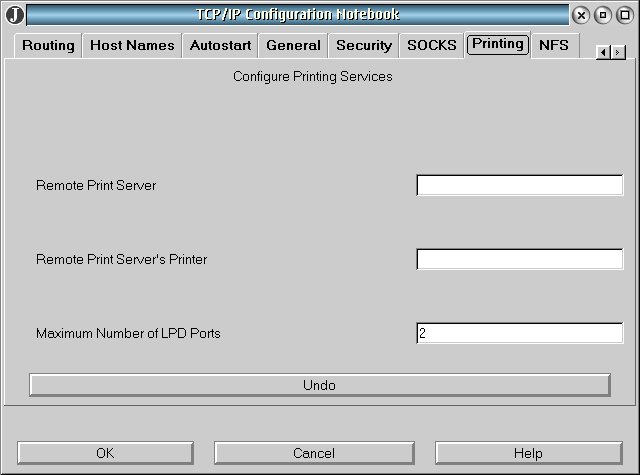
The number of printer ports displayed in the output port page of printer properties is set in the TCP/IP Configuration on the Printing page. No reboot is required, despite the warning from the TCP/IP Configuration program.
To set up a print server for other users on the TCP/IP network, run LPD (Line Printer Daemon). LPD gives other access to each printer object defined on the system.
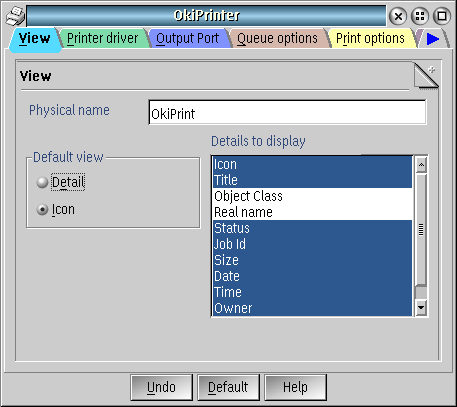
To use a shared LPD printer, edit the output port properties, giving the name or IP address of the computer running LPD as the LPD server, and the physical name of the printer object as the LPD printer. The Physical name of a printer object is displayed on the View tab of the Printer's property notebook.
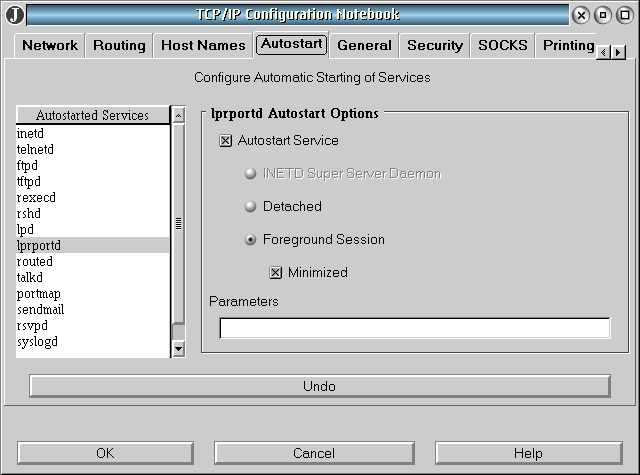
LPRPORTD (The LPR port Daemon) and LPD (Line Printer Daemon) are servers started by TCP/IP. They are configured in the TCP/IP Configuration notebook.
Select lprportd to be started to allow OS/2 to print to a printer attached to the TCP/IP network. Select lpd to be started to allow OS/2 to act as a print server for other computers on the TCP/IP network. For LPD, give the parameter string -c to suppress the printing of a banner page with each print job.
After selecting either of these programs to be started automatically, reboot the system. Note: you can skip rebooting and start the servers from command line.
LPR printing works over the internet. For users with a broadband connection and a router, an adjustment to the firewall in the router must be made. As an example, the Linksys EtherFast Cable/DSL Router with 4-Port Switch (BEFSR41 Router) can be configured to allow remote printing.
Home broadband accounts have a dynamic IP, so it is difficult to know how to contact a computer connected via home broadband. To make it easier, Linksys has partnered with DDNS providers to give your home computer a dynamic hostname. As the IP Address changes, the Linksys router sends updates to the DDNS provider, so that looking up the dynamic hostname gives an accurate IP Address.
Navigate to DynDNS.org, and create an account. A free account will be adequate, unless you need more than 5 hostnames. Create your hostname according to the instructions on DynDNS.org. Once you are done, you will have a hostname like neilwaldhauer.dyndns.info. Remember the logon name, password and hostname so you will be able to enter them into the router configuration.
From the home location, access the router's administration interface. Using a web browser, enter the internal IP address of the router. The administration interface is password protected. Enter your password to gain access to the administration web page. The Linksys gives a first page titled "Basic Setup".
Navigate to the "DDNS" page. Enter your DDNS provider; DynDNS.org. Enter your logon credentials and hostname for your DDNS provider. Press save settings for the change to take effect.
Navigate to the "Applications and Gaming" page. From this page, navigate to the "DMZ" page. If your printer is a network printer, enter the IP address of your printer as the DMZ Host IP Address. If your printer is attached to a computer, enter the IP Address of the computer. Press save settings for the change to take effect.
If you have a network printer, you should be able to open its administration page by opening your hostname in a web browser.
Make sure you can print from your home location before you attempt remote printing. Make sure LPRPORTD is running. Set up a printer object to print using an LPR port as described above. Configure the port settings to use the printer using the same IP Address used for the router's DMZ Host IP Address. Enter the correct LPD printer name, and test your printer.
Change the output port settings for the LPD Server to be the hostname you got from the DDNS provider. If you can print, go to the remote site to test remote printing.
From the remote site, connect to the internet, and print a test page using the same printer. If the page is not printed, switch to the LPRPORTD window and view any error codes.
This printing method opens the printer to the internet. I haven't yet tested with other platforms. This method of printing isn't really secure. Anyone who knows your hostname can print to your printer. I suppose someone could invent a virus that could infect a printer.