
As an OS/2 user, I have limited choices when I want to use a laptop with Wifi. Life got better when I bought a Travel Router. A Travel router can be connected to the Ethernet port of my laptop and provide a good WiFi connection even if my laptop has only support for the Ethernet port.
This page describes using a Travel Router to add WiFi capability to my OS/2-compatible computers. I haven't yet tried any devices that offer cellular capabilities. When I want cellular, I connect my Travel Router to the hot spot on my cell phone.
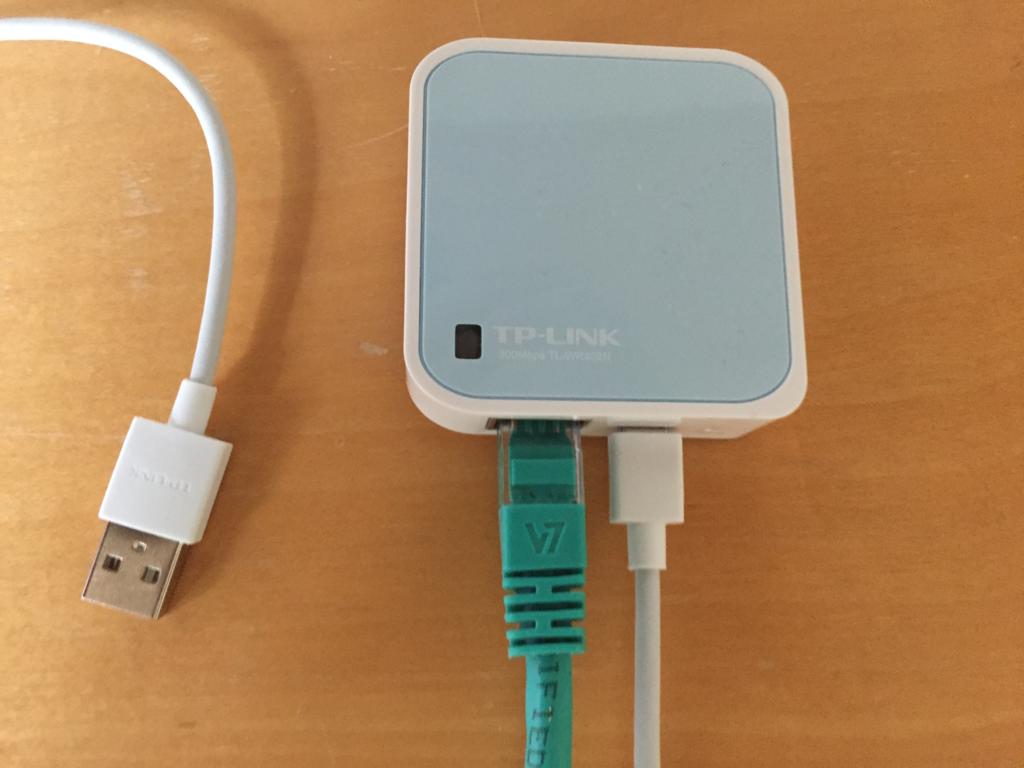
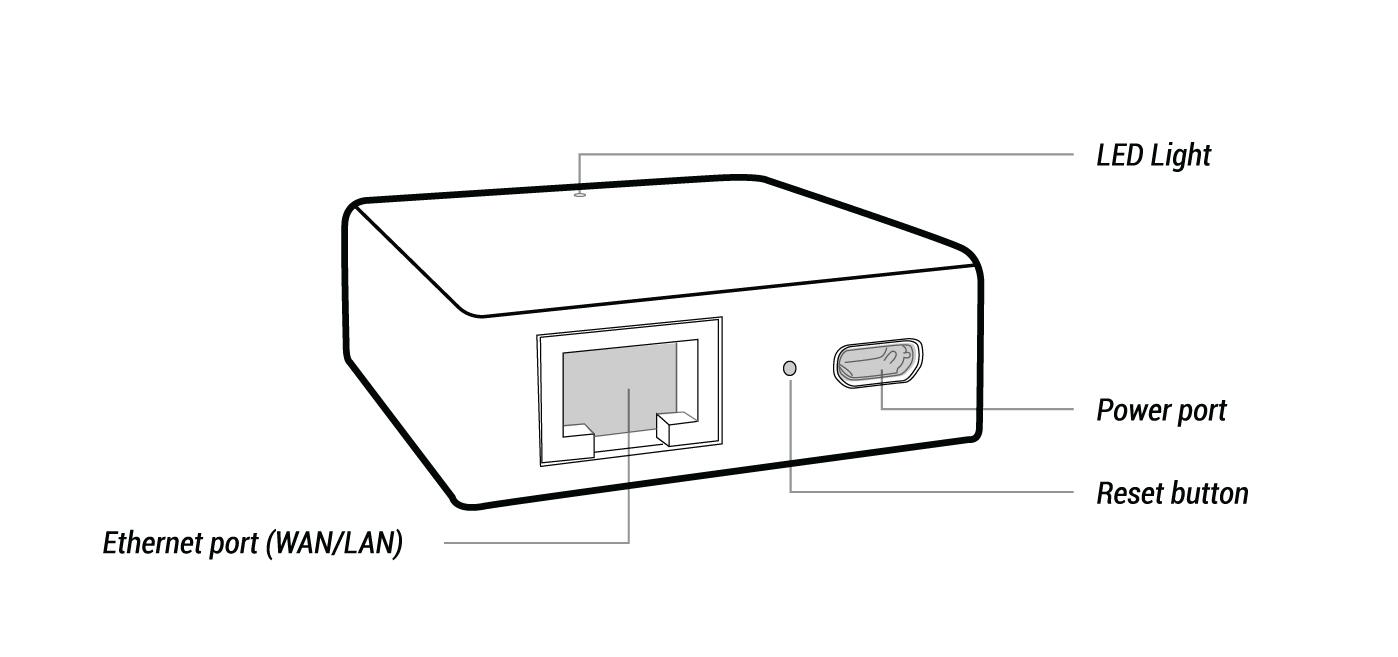
The idea is to connect the Ethernet port of the laptop to the travel router. Depending on the type of travel router, power can come from the wall or it can come from a USB port of the laptop.
When you want to use your laptop in WiFi, connect the Travel Router to power and Ethernet between the router and the laptop. power them both and wait for the light on the Travel router to show that it is ready.
Six routers are presented here, an Asus RP-N12 that plugs into the wall, a TP-Link Nano Router, a TP-Link AC750, a VIXMINI and a Mango that plug into a USB port for power. I am now also using an Opal dual-band router. If any of the USB-powered routers are plugged into the USB port of the laptop, then it can run from laptop battery power. This will reduce the time available on battery power.
The easiest way to use WiFi is to let the computer get an IP address automatically. This is the default setting in OS/2, and it can easily be set by the TCP/IP configuration in the Setup folder (Local System->System Setup->Network->TCP/IP->TCP/IP configuration). For simplicity, I'll describe the configuration of the router assuming the computer will get an address automatically.
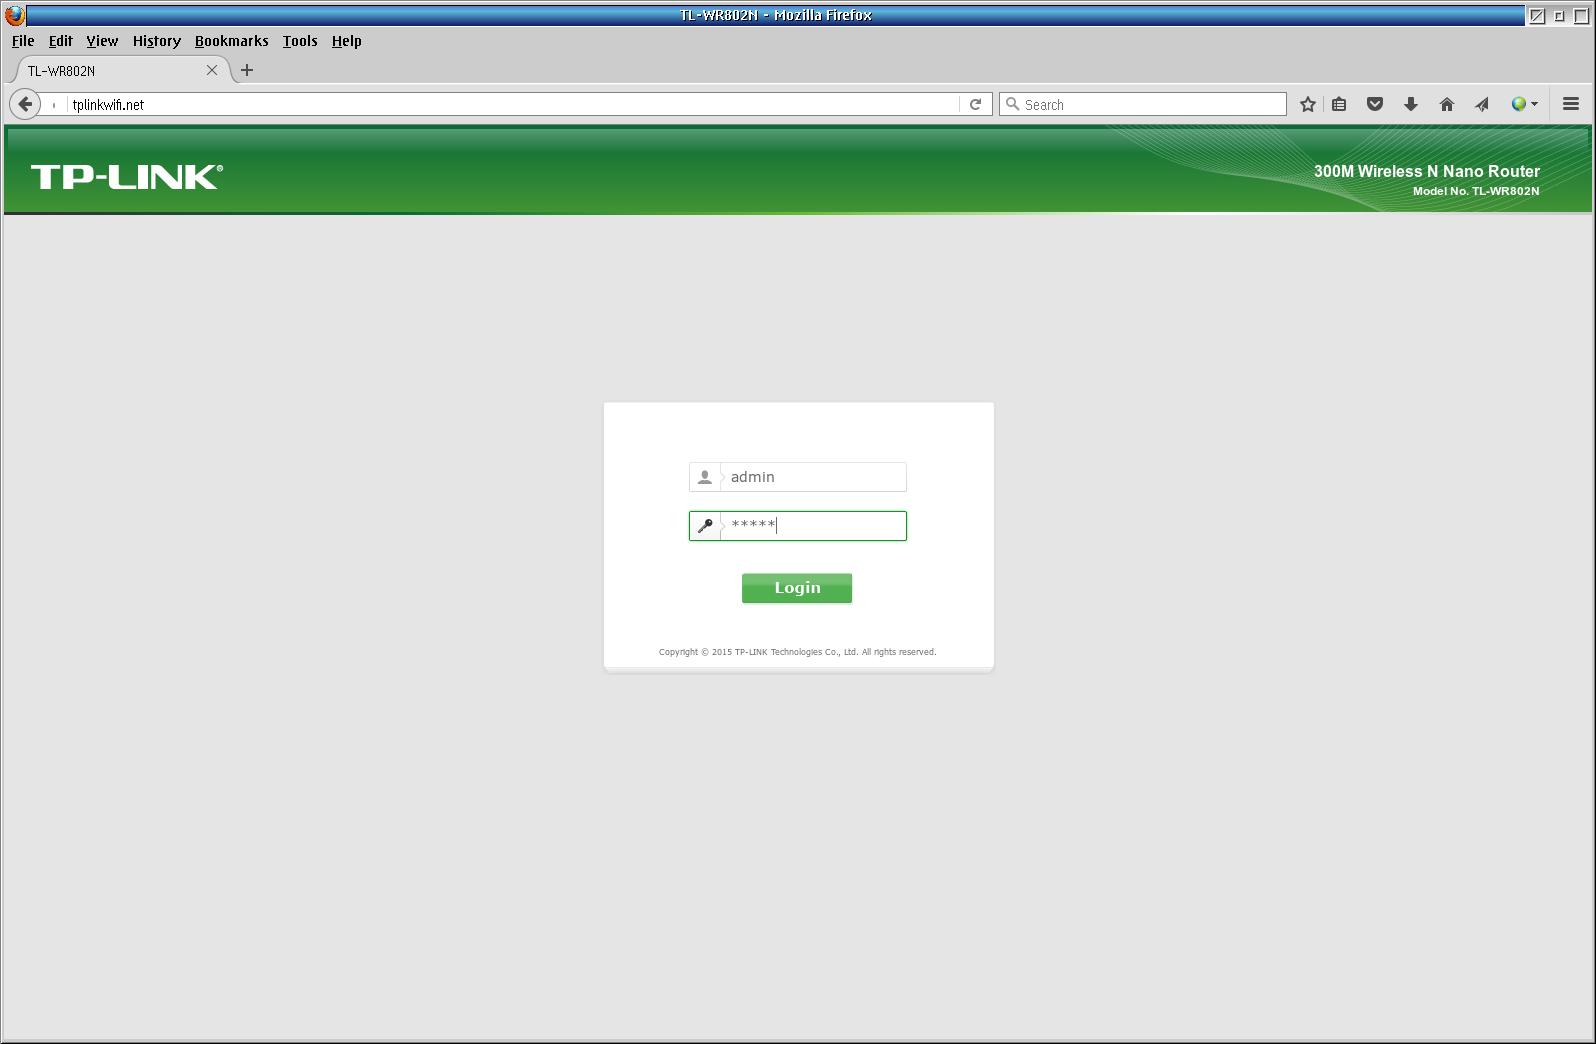
When the Travel router shows ready, open the web browser to the table listed below. This will bring up the travel router administration logon prompt. If it does not, the travel router wasn't ready or the laptop didn't get an IP address. Reboot to give it another chance.
| Product | Administration URL | Username | Password | Details | 2 GHz | 5 GHz |
|---|---|---|---|---|---|---|
| TP-Link Nano Router | http://tplinkwifi.net | admin | admin | Nano | Yes | No |
| RP-N12 | http://repeater.asus.com | admin | admin | Nano | Yes | No |
| TP-Link AC750 Wireless Travel Router | http://tplinkwifi.net | admin | admin | Nano | Yes | No |
| VIXMINI | http://192.168.8.1 | root | goodlife | VIXMINI | Yes | No |
| Mango | http://192.168.8.1 | root | goodlife | Mango | Yes | No |
| Opal | http://192.168.8.1 | root | goodlife | Opal | Yes | Yes |
Only the TP-Link screens are shown, but the screens for the Asus are very similar. The TP-Link AC750 screens are also very similar. The VIXMINI screens are completely different. Further, the VIXMINI is running dd-wrt, so that set of screens are available as well.
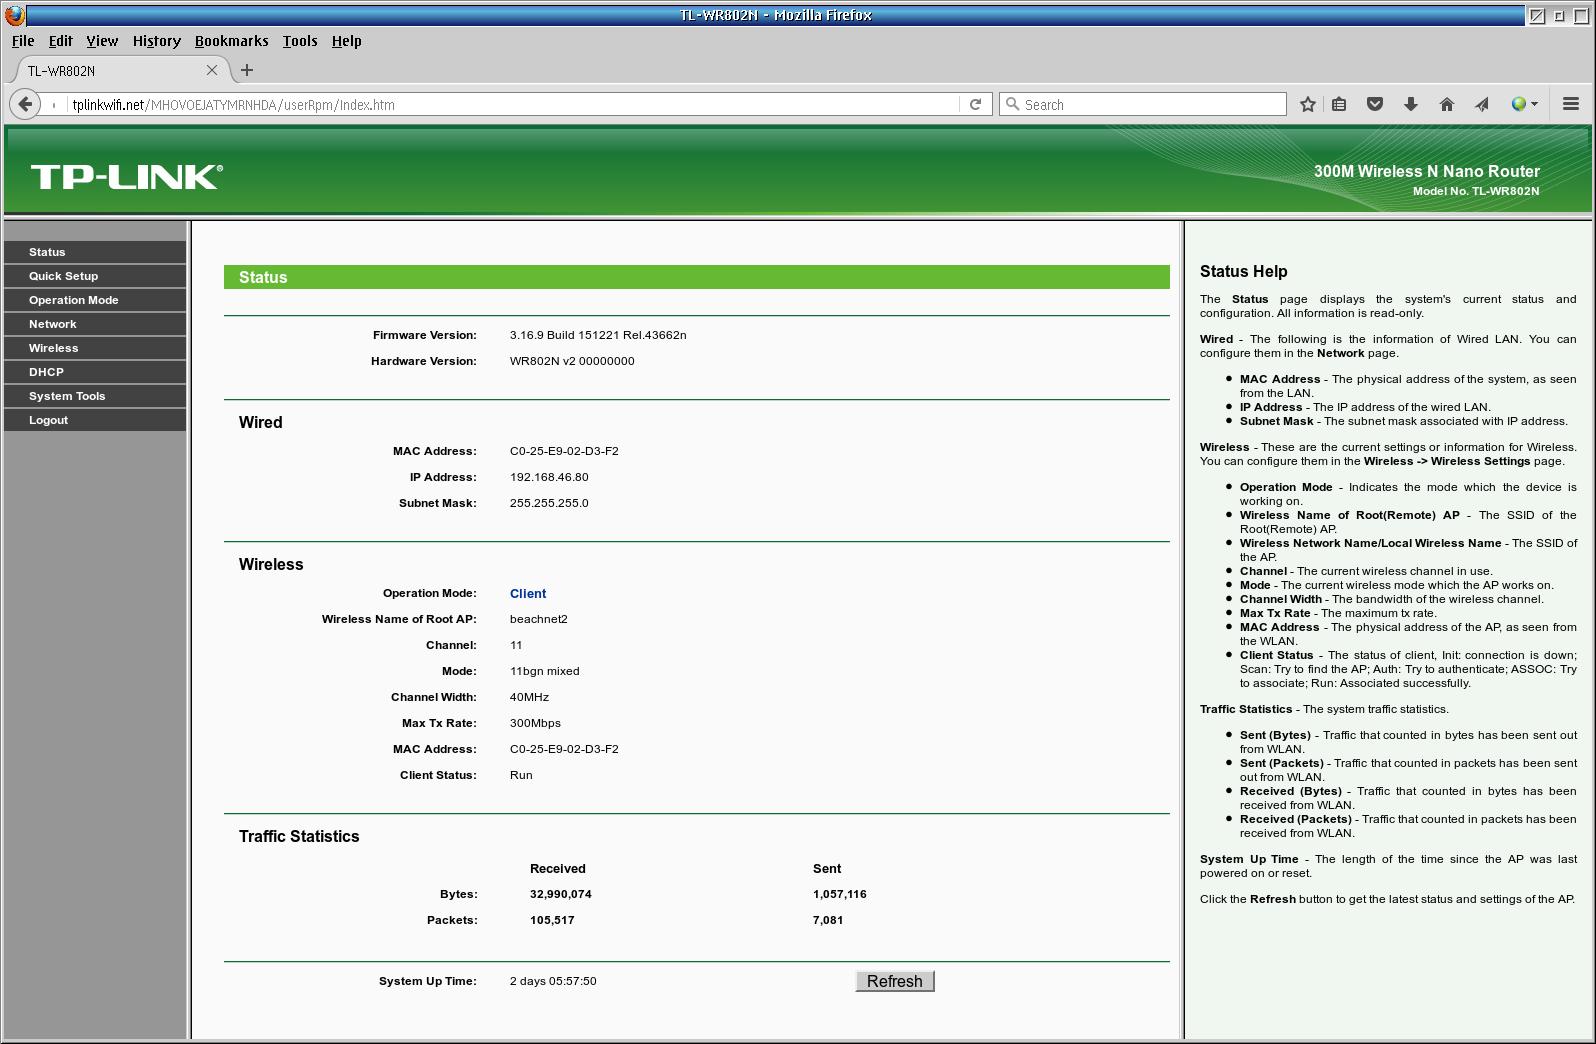
Log on to the router using the username and password listed above. Once you are logged it, the router will display a status screen. The screens are listed below.
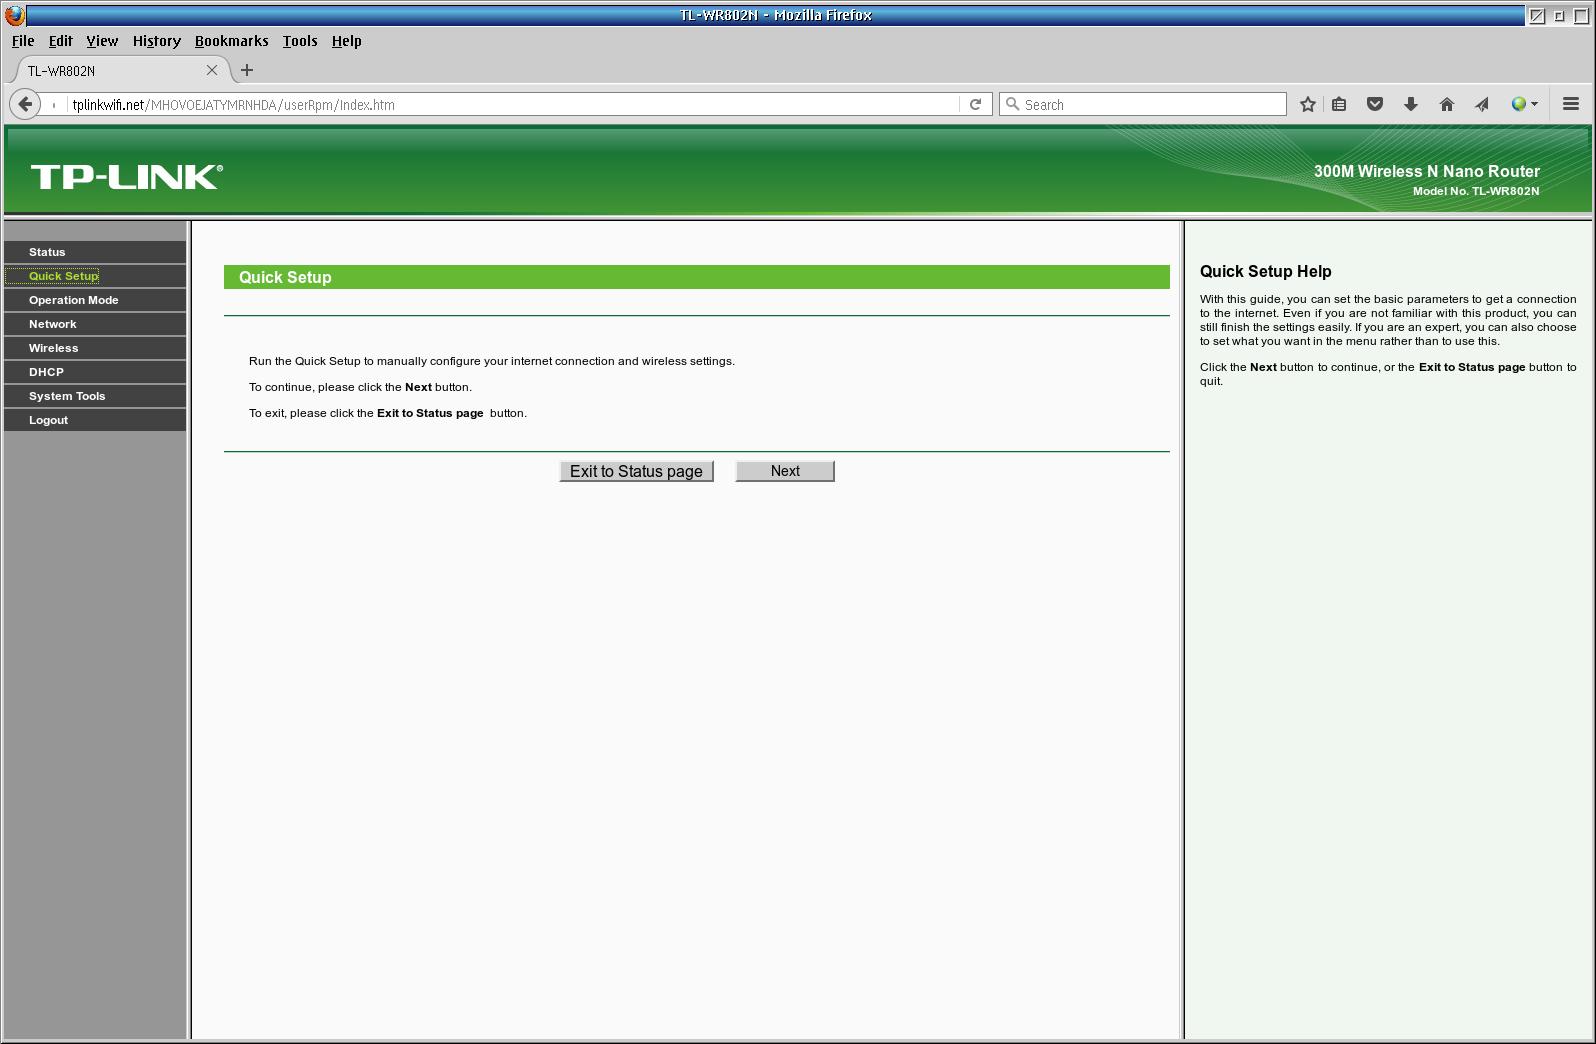
On the Status screen of either Travel Router, select quick setup. You want to configure as a client. That should lead you to a screen where you select among the available WiFi access points. You will be prompted for a password if one is required. The router will ask to reboot. You will also need to reboot the laptop (or release/request a new IP address if you know how) to get your new IP address.
At this point you should be connnected to the Internet and to any services available on the local LAN. You can power both the laptop and the Travel router,and settings will be restored on your next powerup. You only need to repeat this procedure to use a new access point.
The default userid is admin and password is admin. Logging in will bring up the Status Screen.
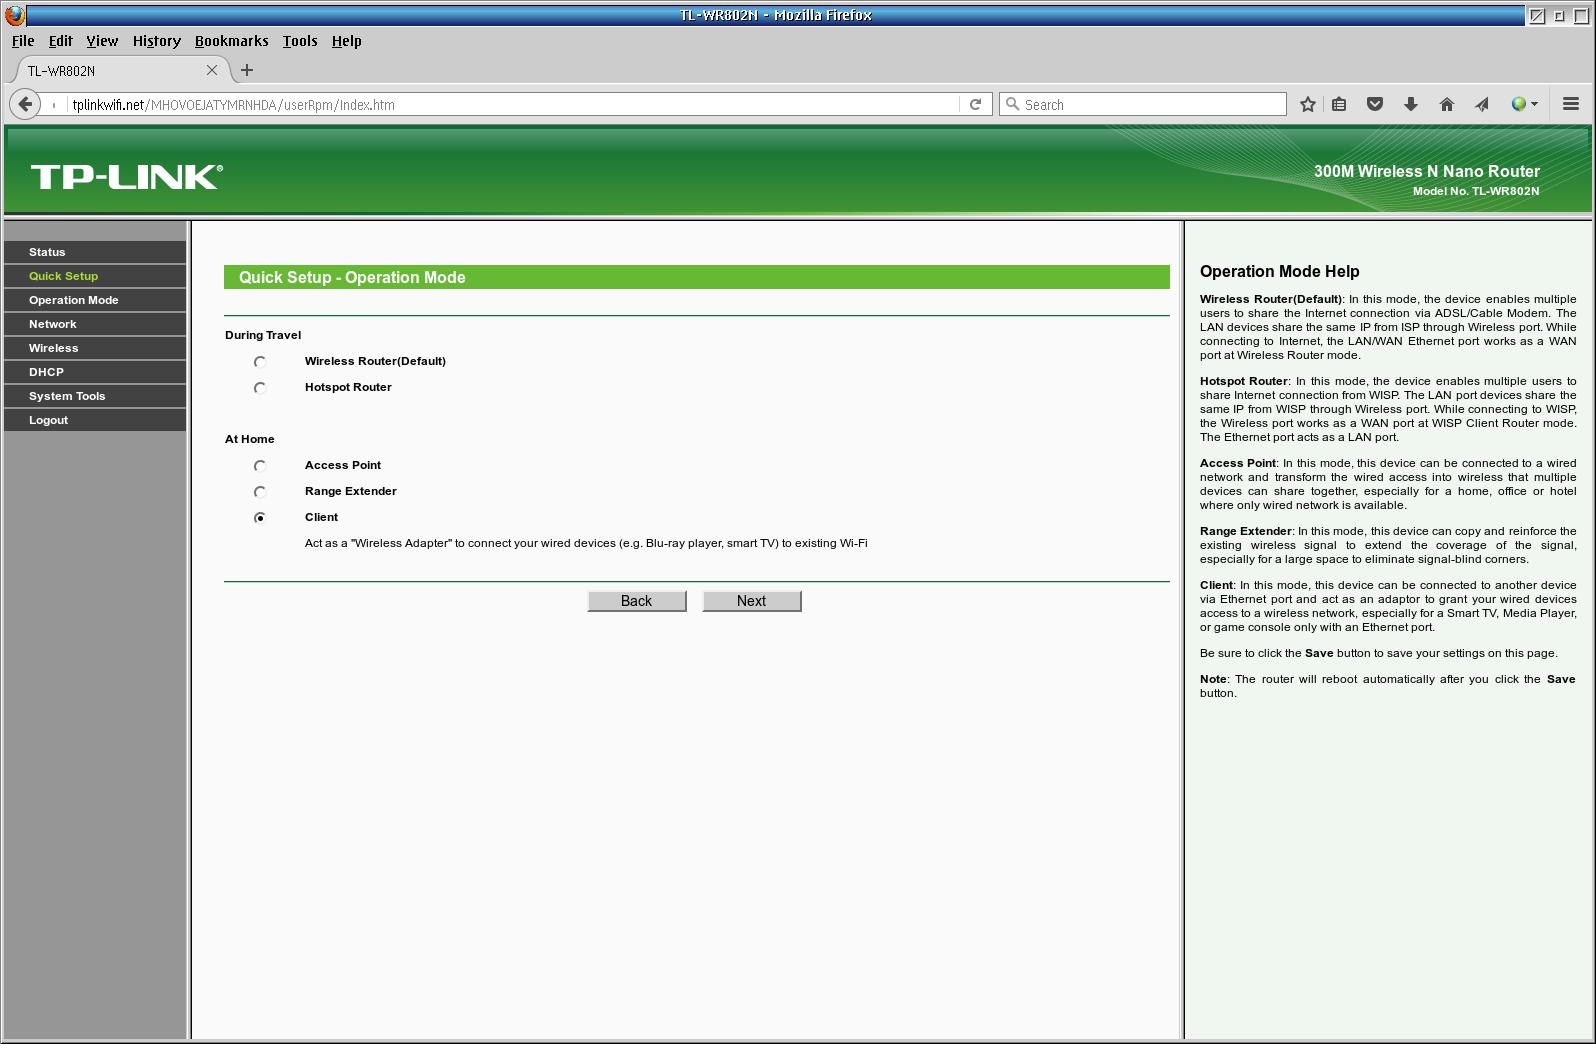
To set up networking, choose Quick Setup in the upper left part of the screen.
Press Next to start configuring WiFi.
Choose Client on this screen. The other modes won't help for the task of bringing WiFi to our OS/2 laptop.
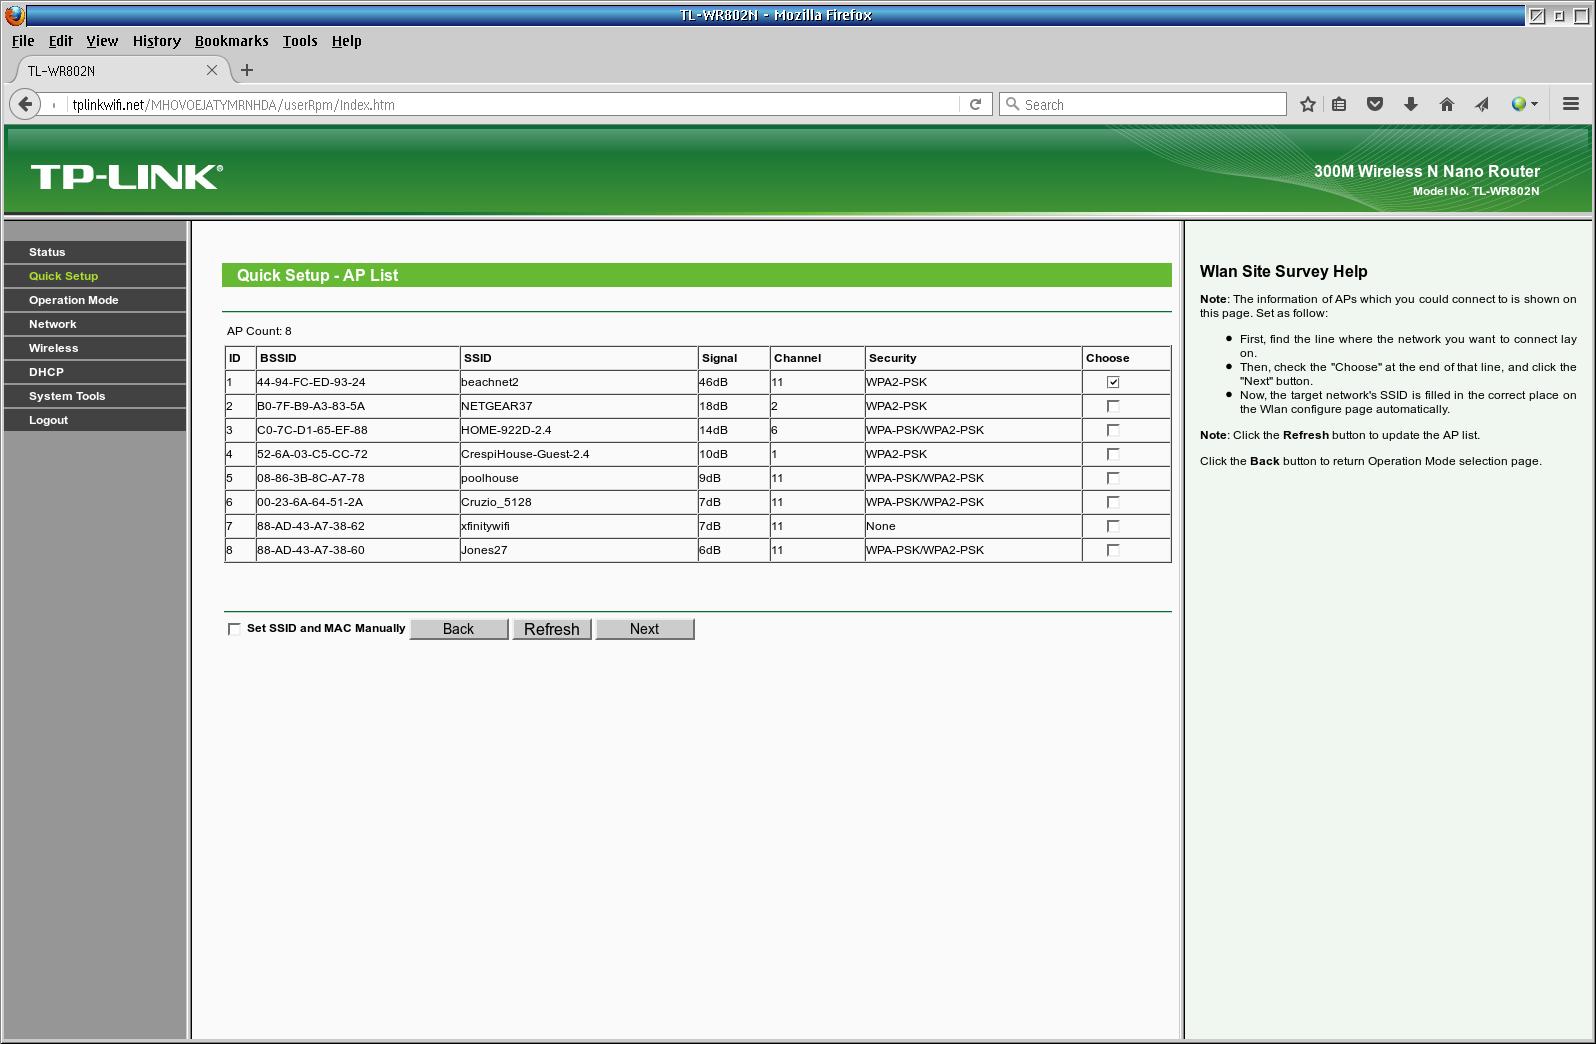
After scanning for WiFi signal, a list of WiFi access points should appear. In my case, I pick beachnet2, which is the name I selected for my office router. Check the box for the router you want to use and press Next.
My router demands a password, so I enter it here. If no password is required, this screen will not appear.
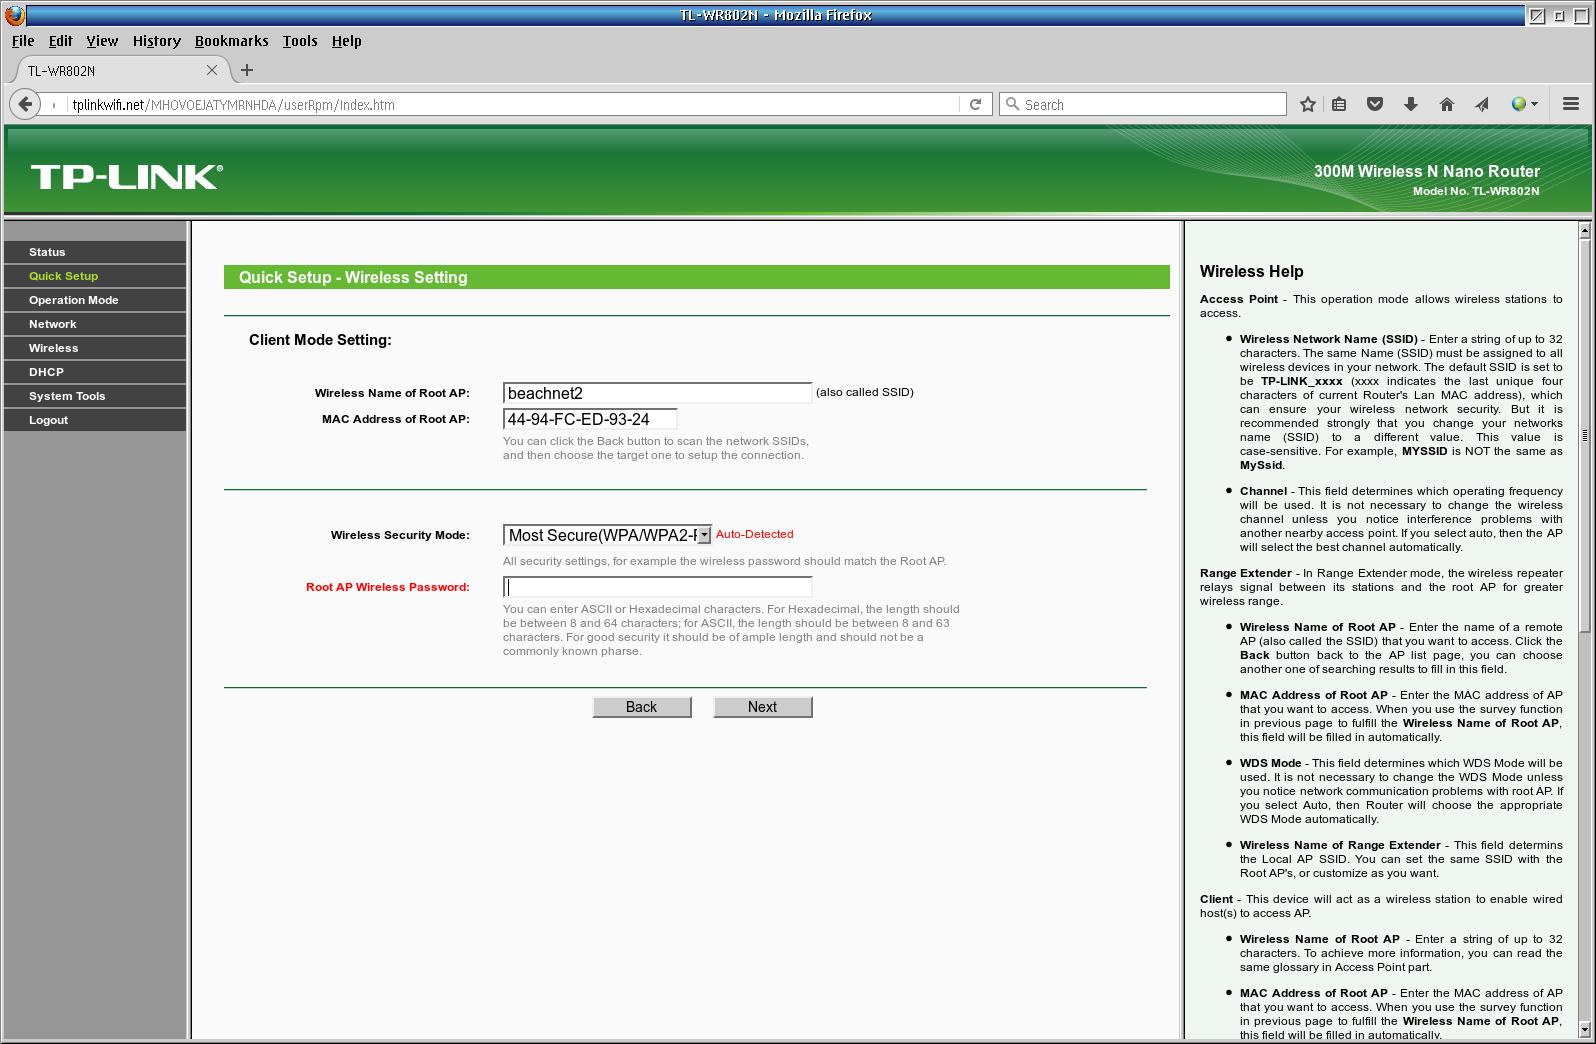
I recommend using SmartIP, the default. This passes through the IP address given by the WiFi access point. For file sharing using SAMBA or for printing, this will help. This setting is less important for a public WiFi.

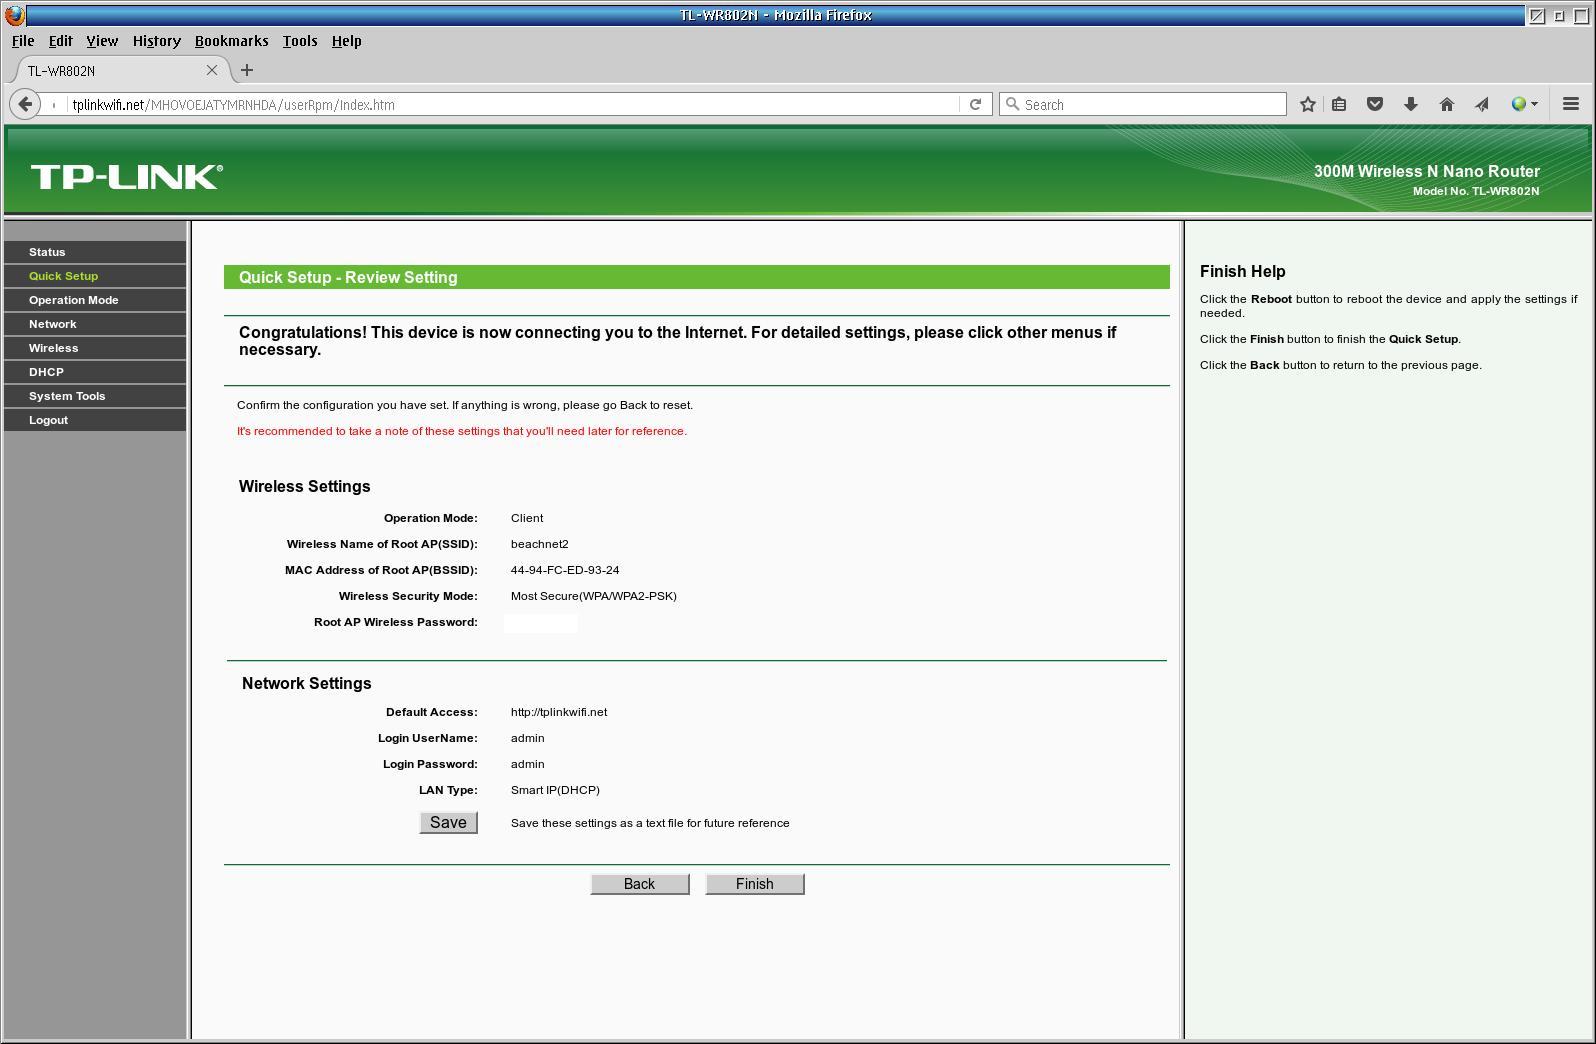
WiFi is now configured. To use WiFi, you can reboot the laptop now, or simply wait for the DHCP settings to update to the new configuration. The WiFi settings will remain until you change them again.
I have cut the WiFi Password out of the screenshot. Normally the password will appear on this screen just as you entered it.
The router is ready to use.
The VIXMINI is smaller, lighter and cheaper than the other routers. It is also far more capable. The open-source GL-iNet runs on top of dd-wrt. Menus for both systems are available The flexibility allows power users to do almost anything with this device.
First time setup instructions for VIXMINI are on-line here:
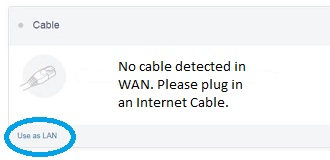
SetupPerform the basic setup with the LAN cable unplugged. Then, when the WiFi is configured, go to the Internet section of admin panel and under Cable section - Click 'Use at LAN'. This will complete the configuration.
Connect the cable, and the computer should get an IP address from VIXMINI. VIXMINI can remember connections and can automatically connect to services that it remembers.
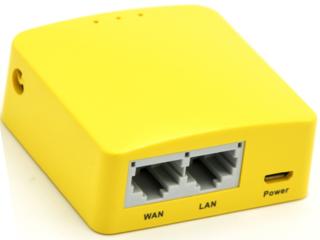
The Mango is the replacement for the VIXMINI. The full name of the product is GL.iNet Mini Travel Router (GL-MT300N-V2) While still smaller, lighter and cheaper than the other routers, it is a little larger than VIXMINI. It is also far more capable. The open-source GL-iNet runs on top of dd-wrt. Menus for both systems are available The flexibility allows power users to do almost anything with this device.
The Mango Travel router gets its power from the USB connection. If the router is plugged into the laptop, and the laptop does not provide enough power, then the travel router will not function. To test, I use my iPhone to scan for the SSID of the travel router. If it does not appear, then the travel router is not functioning. Try plugging into another USB slot.
If you have a Mango router that was supplied with a Blonde Guy laptop, consult the following user's guide. Using the Mango router with a Blonde Guy laptop
Unfortunately, the Mango Admin interface is not usable with Firefox 45. The Dooble web browser can display the admin panel.
Connect the Mango to your computer. Your computer should be set up to configure TCP/IP automatically over DHCP. When the Mango has initialized, you should have an IP address. Start Dooble and visit 192.168.8.1. You should be prompted to change your password.
After changing password, Mango should show a page with configuration options. Scroll down to the repeater section and press Scan. Scan should find any 2.4 GHz WiFi networks and allow you to connect.
SetupPerform the basic setup with the Ethernet cable connecting the comptuer to the LAN port of the Mango. The computer should get an IP address from Mango. This will complete the configuration. Mango can remember connections and can automatically connect to services that it remembers.
Once the Mango router is working as a repeater, on OS/2 (or ArcaOS), you can use either the Firefox 45 browser or MangoCom to control the router. This will give easy access while using OS/2.
The Mango is a very versatile network appliance. There are a lot of other settings available. I have found it useful to consult the FAQ.
FAQ
The Opal is a compact dual-band router that is very similar to the smaller single-band Mango router. The full name of the product is GL.iNet Gigabit Wireless Router (GL-SFT1200) The open-source GL-iNet runs on top of dd-wrt. Menus for both systems are available The flexibility allows power users to do almost anything with this device.
First, a little background. IBM gave OS/2 a couple of drivers for WiFi in the 1990s. They worked with PCMCIA cards. These cards are no longer made, as well as the laptops with PCMCIA slots also no longer made.
So much for native drivers.
For a while, we had some support for WiFi using the GenMac project. This allowed us to use a few mini-PCI WiFi cards from the early 2000s. GenMac works by loading the Windows 2000 driver using ODIN. The author quit developing in 2004.
In the mid 2000s, people searched for Windows 2000 drivers that would load into the GenMac framework. This lead to the GenMu project and a few drivers were added.
No progress was made in hardware support for WiFi since then.
The original WiFi drivers from IBM were so hard to use in real life that someone wrote XWLAN, which loads and configures the device drivers and works to monitor and connect to various Access Points. This program has been developed over time, but still has significant bugs. It cannot connect to an iPhone hotspot for example, and instead traps in the kernel.
The best choices are now to use one of the early 2000 devices. These provice 802.11B and sometimes G. They work with GenMac and rarely trap. XWLAN will connect to some Access Points. The problem is the devices are old and rare at this point. New laptops often do not allow such an old device to plug in.
The second best choice, shown in my Arbopeep and Hobopeep computers, is to use a device supported by GenMu. GenMu is fragile, and subject to crashes, but it does allow 802.11n in some cases. The limitations of XWLAN still apply. The mini-PCI bus is no longer found on newer laptops.
The third best choice is to use a reasonably modern laptop with an external travel router. This gets you WiFi with only a wired ethernet connector needing support from OS/2. Thanks to Arca Noae, there is good support for most ethernet controllers. This is the route I have chosen for my own use of WiFi on my computers. Travel routers are modern supported devices that work well with iPhone hotspot, which gives me pretty good network support. Modern travel routers generally support 802.11ac.
In the future, Arca Noae will develop a WiFi driver for modern hardware. This is a low priority, because I have documented how to use travel routers, and people have generally found this to be acceptable. It's certainly the most reliable and flexible of all the WiFi support available to OS/2 users.
Modern laptops have WiFi hardware. For now, ArcaOS ignores this hardware completely.